목차
1.설치 버전
Linux : CentOS Linux release 7.9.2009 (Core)
Java : 1.8.0_362
2. Java 설치
1) yum으로 설치가능한 java 버전 확인 후 java 설치
# yum list java*jdk-devel
# yum install -y java-1.8.0-openjdk-devel.x86_64
2) java가 여러개로 설치된 경우 아래 명령어로 선택해준다.
# sudo /usr/sbin/alternatives --config java3) 환경변수
① 환경변수 설정 여부 확인
# echo $JAVA_HOME
# $JAVA_HOME/bin/javac -version
- $JAVA_HOME 변수 설정이 되어 있는 지 확인한다.(되어 있다면 자바 설치 끝)
② 환경변수 설정
# vi /etc/profile- 제일 하단에 'export JAVA_HOME=/usr/lib/jvm/java-1.8.0-openjdk' 입력 후 저장한다.
# source /etc/profile- 수정한 파일을 적용한다. ( ①번으로 돌아가서 변수 설정이 정상적으로 되었는지 확인 )
3. Jenkins 설치
1) 젠킨스 저장소 설치
# sudo wget -O /etc/yum.repos.d/jenkins.repo https://pkg.jenkins.io/redhat-stable/jenkins.repo
# sudo rpm --import https://pkg.jenkins.io/redhat-stable/jenkins.io.key
명령어 실행 중 (ERROR: cannot verify pkg.jenkins.io's certificate) 발생 시 아래 글로 해결
Jenkins Error ] cannot verify pkg.jenkins.io's certificate
젠킨스 설치하는 법을 따라하다 첫 관문부터 발생한 에러 해결법 공유 1. 오류 발생 과정 # wget -O /etc/yum.repos.d/jenkins.repo https://pkg.jenkins.io/redhat-stable/jenkins.repo (* 리눅스 서버에서 위 명령어 입력
jfbta.tistory.com
2) 젠킨스 설치
① jenkins.war 다운
-- jenkins.war 파일 경로로 이동
# cd /usr/share/java

-- 기존에 jenkins.war 파일이 존재하는 경우
# mv jenkins.war jenkins.old

-- jenkins.war 다운
# wget https://get.jenkins.io/war-stable/2.263.4/jenkins.war
② jenkins rpm 설치파일 다운
-- 최신버전 설치
# sudo yum install jenkins -y

-- 원하는 버전 설치
-- 1. 젠킨스 설치파일을 다운로드
# wget https://get.jenkins.io/redhat-stable/jenkins-2.263.4-1.1.noarch.rpm

-- 2. 젠킨스 설치파일 실행
# yum install jenkins-2.263.4-1.1.noarch.rpm
* 존재하는 jenkins 버전 확인 (https://get.jenkins.io/redhat-stable/)
3) 젠킨스 버전 확인
- # rpm -qa | grep jenkins

4) jenkins user 설정 및 포트 설정
## 1. jenkins 설정에서 변경
# vim /etc/sysconfig/jenkins

## 2. service 설정에서 변경
# vim /usr/lib/systemd/system/jenkins.service
1. /etc/sysconfig/jenkins
## Type:        string
## Default:     "jenkins"
## ServiceRestart: jenkins
#
# Unix user account that runs the Jenkins daemon
# Be careful when you change this, as you need to update
# permissions of $JENKINS_HOME and /var/log/jenkins,
# and if you have already run Jenkins, potentially other
# directories such as /var/cache/jenkins .
#
JENKINS_USER="root"
2. /usr/lib/systemd/system/jenkins.service
# Configures the time to wait for start-up. If Jenkins does not signal start-up
# completion within the configured time, the service will be considered failed
# and will be shut down again. Takes a unit-less value in seconds, or a time span
# value such as "5min 20s". Pass "infinity" to disable the timeout logic.
#TimeoutStartSec=90

# Unix account that runs the Jenkins daemon
# Be careful when you change this, as you need to update the permissions of
# $JENKINS_HOME, $JENKINS_LOG, and (if you have already run Jenkins)
# $JENKINS_WEBROOT.
User=root
Group=root
필자는 root 권한으로 모든 것을 사용하기 때문에 root로 바꿔준다.
# chown -R root:root /var/lib/jenkins
# chown -R root:root /var/cache/jenkins
# chown -R root:root /var/log/jenkins
1. /etc/sysconfig/jenkins
## Type:        integer(0:65535)
## Default:     8080
## ServiceRestart: jenkins
#
# Port Jenkins is listening on.
# Set to -1 to disable
#
JENKINS_PORT="8080"
2. /usr/lib/systemd/system/jenkins.service
# IP address to listen on for HTTP requests.
# The default is to listen on all interfaces (0.0.0.0).
#Environment="JENKINS_LISTEN_ADDRESS="

# Port to listen on for HTTP requests. Set to -1 to disable.
# To be able to listen on privileged ports (port numbers less than 1024),
# add the CAP_NET_BIND_SERVICE capability to the AmbientCapabilities
# directive below.
Environment="JENKINS_PORT=9000"
- JENKINS_PORT를 원하는 번호로 변경(필자는 9000으로 변경함) 변경을 완료하였으면 :wq로 저장 후 빠져 나온다.
5) jenkins 실행
## jenkins 실행 명령어
# systemctl start jenkins.service

## jenkins 실행중인지 확인 명령어
## 1.
# ps -ef | grep jenkins
## 2.
# systemctl status jenkins.service
6) 젠킨스 접근
- 웹브라우저 URL에 '서버IP:9000' 입력
7) Administrator password 알아내기
# cat /var/lib/jenkins/secrets/initialAdminPassword8) 6번에서 알아낸 Administrator password 아래 빨간박스에 입력 후 Continue 버튼 클릭

9) install suggested plugins 선택

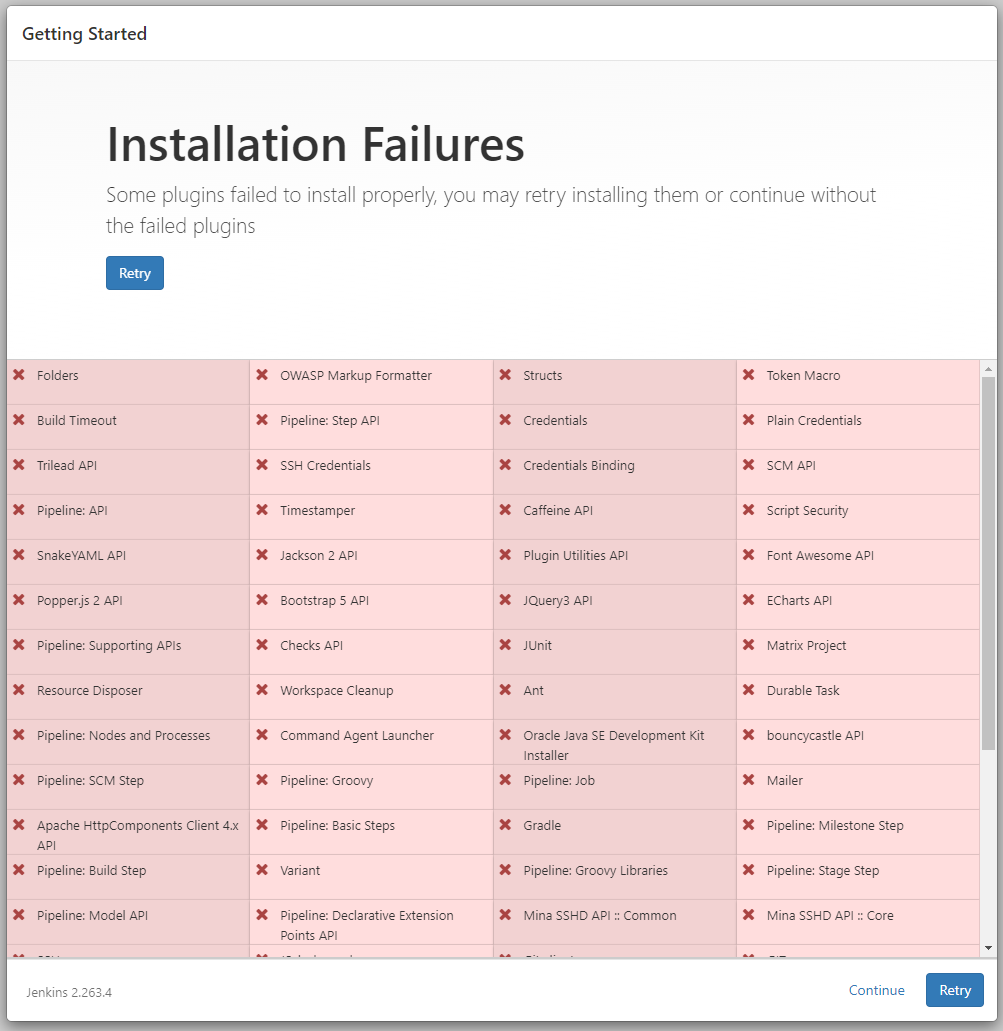
10) Installation Failures가 떳다 ㅠ
11) Continue를 눌러서 넘어가자
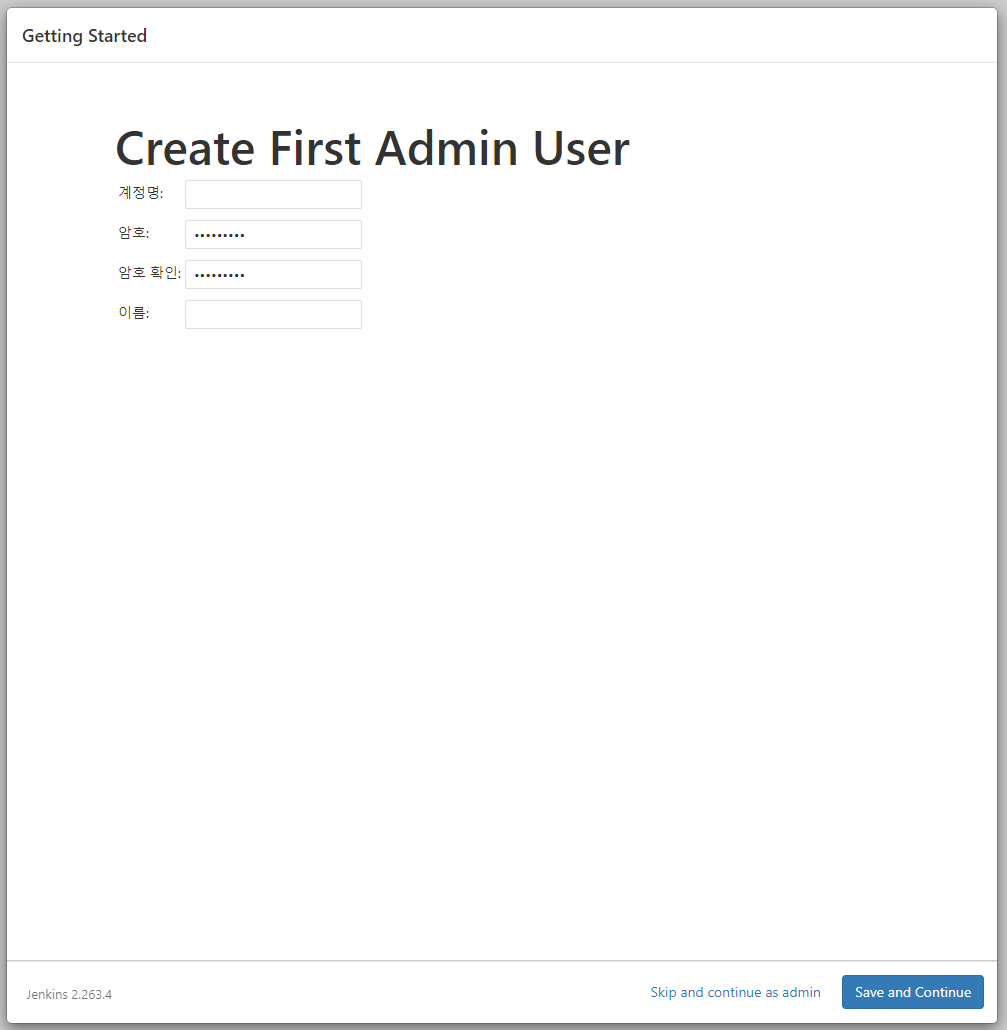
12) 텍스트박스에 내용 입력 후 'Save and Continue' 선택

13) 'Save and Finish' 선택

14) 현재 플러그인은 젠킨스 버전 2.319.3이상을 사용해야 대부분 호환이 가능하다.

- 해당 버전으로 업그레이드 하면 해결된다.
(* 23년 3월 21일 기준 jenkins-2.332.4-1.1.noarch 버전을 추천한다.[JDK 8과 11에서 호환 및 모든 플러그인 설치 가능])
'DevOps > Jenkins' 카테고리의 다른 글
| Jenkins 3탄] 젠킨스 nodeJS 설치 후 패킹 전 build 하는 법 (1) | 2023.03.30 |
|---|---|
| Jenkins ] 젠킨스 플러그인 설치 방법 (0) | 2023.03.29 |
| Jenkins 0탄 ] 서로 다른 서버에서 ssh 젠킨스 환경 세팅 목록 공유 (1) | 2023.03.28 |
| Jenkins 2탄] 원격 저장소 Git 연동하기 (0) | 2023.03.23 |
| Jenkins Error ] cannot verify pkg.jenkins.io's certificate (0) | 2023.03.20 |